My Blog List

Showing posts with label HACKING TRICKS. Show all posts

Tuesday, 7 August 2012

How to Crack WInRAR Registration (Easy Way)


Step1:- Download Resource Hacker from Here
Step2:- Open Resource Hacker and click open.
Step3:- Choose C:\Program Files (x86)\WinRAR/WinRAR.exe
Step4: You’ll see a lots of directories under it Scroll down and find ‘REMINDER’ under the DialogSection
Step5: Under REMINDER right click on 1033 and Click on Delete Resource [Dialog: REMINDER: 1033]


Step6: Save as the file at another location. Please ensure that it must not be the original location of Winrar.exe
Step7: Now copy the saved (new edited copy) of WinRAR.exe and paste it in its installation directory, and replace the original WinRAR.exe
now last Step Just Clik on Continue

Friday, 3 August 2012

TORJAN REMOVER 6.8.2+ Keys


Detects and automatically removes malware without the need to use SAFE mode.


Trojan Remover is designed to automatically remove malware (trojans, worms, adware, spyware, etc.) from a PC when standard anti-virus software has either failed to detect the malware or is unable to effectively eliminate it. 


Trojan Remover aids in the removal of Malware - Trojan Horses, Worms, Adware, Spyware - when standard anti-virus software either fails to detect them or fails to effectively eliminate them. Standard antivirus programs are good at detecting this Malware, but not always so good at effectively removing it.


Trojan Remover is designed specifically to disable/remove Malware without the user having to manually edit system files or the Registry. The program also removes the additional system modifications some Malware carries out which are ignored by standard antivirus and trojan scanners.


What Trojan Remover Does

Trojan Remover examines all the system files, the Windows Registry and the programs and files loaded at boot time. The majority of malicious programs (once triggered) load this way.


Trojan Remover scans ALL the files loaded at boot time for Adware, Spyware, Remote Access Trojans, Internet Worms and other malware. Trojan Remover also checks to see if Windows loads Services which are hidden by Rootkit techniques and warns you if it finds any. 


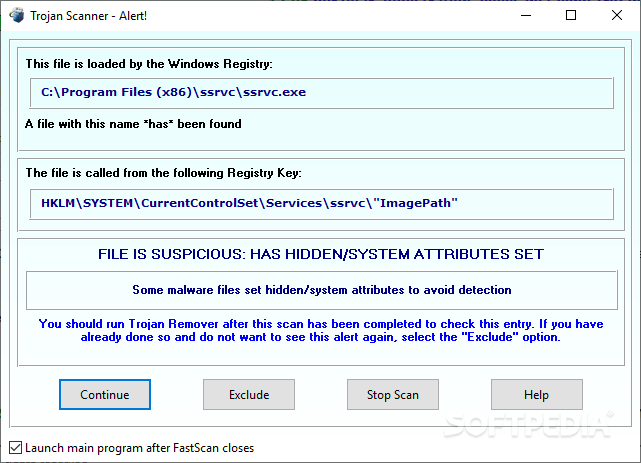
For each identified Trojan Horse, Worm, or other malware, Trojan Remover pops up an alert screen which shows the file location and name; it offers to remove the program's reference from the system files and allows you to rename the file to stop its activation.


Most modern Malware programs are memory-resident, which makes their de-activation more difficult. How many times have you been told to start your computer in 'Safe' mode, or even worse, in DOS? Trojan Remover does all this for you. When it finds Malware that is memory-resident, Trojan Remover automatically re-starts (on request) your system and completely DISABLES the Malware before Windows restarts. 


Trojan Remover writes a detailed logfile every time it performs a scan. This logfile contains information on which programs load at boot-time, and what (if any) actions Trojan Remover carried out. The logfile can be viewed and printed using Notepad. 


The FastScan component of Trojan Remover is set to automatically scan for Malware every time you start your PC (you can disable this if you wish). You can also run the FastScan manually any time you wish (START | Programs | Trojan Remover | FastScan). This FastScan checks all program-loading points - it is a quick and effective check for actively-loading malicious programs.


You can scan the whole drive, or any directories on the drive, by selecting Scan a Drive/Directory from the main Trojan Remover menu. You can scan individual files and directories from within Windows Explorer. 


Trojan Remover incorporates an integral Updater allowing for quick and easy Database updates. You can use the Windows Task Scheduler to schedule automatic updates.


Note: Trojan Remover will not work on 64 bits operating systems.
Download

Thursday, 2 August 2012

How to Block Websites without using any Software


How to Block Websites without using any Software


Many times we need to unblock certain websites to gain access to some important stuffs. We all know many ways to do that. But how about actually learning to block one?


Have you even been in a situation when you have to block certain websites from your computer for any reason? Well, I am not sure about any body else but certainly I have been many times in such situation. Parents may also want to prevent access to certain websites on their computer so that children can’t get to them from internet.

So what’s the solution?

Aaaah… It’s very simple.

1.) Open “Run” from the start menu (or press WinKey + r). Just copy paste the following path and hit ENTER.

notepad %windir%\system32\drivers\etc\hosts

Alternately, go to C:\Windows\System32\Drivers\Etc and find the file “hosts”. Open that file in Notepad.

2.) When this hosts file is opened in Notepad, at the end of the file you will see something like “127.0.0.1 localhost”.

3.) Under “127.0.0.1 localhost” just add another website URL that you want to block.

For Example:-

127.0.0.1 localhost
127.0.0.2 www.sex.com
127.0.0.3 www.facebook.com
127.0.0.4 www.google.com

4.) Make sure every time you add another website, the last digit of the address 127.0.0.x should not be the same.

5.) Save the file and exit.

So, here you go. Restart your browser if it is opened and changes will take place immediately.

The good thing is that no message, no pop ups nothing will be displayed when someone tries to open a blocked website. Your browser will just fail to open those websites without any error messages.

Some tricky Tricks of google


1. Goto www.google.com,and write in the search bar “hackers for google” and open the first page.It’s the page which let’s you search the red rated websites and the website which are deeply hidden like hacking tools and hacking stuff website……

2. Write in the search bar

1> “intitle:”Live View / – AXIS”
2> inurl:indexFrame.shtml”Axis Video Server”
3> inurl:LvAppl intitle:livespplet
4> intitle:”WJ-NT104 Main”
5> intitle:”snc-rz30 home”

any of this above five commands let you see the unsecured CCTV camera servers…
it works if you write any of this command in the search bar and search for the result.. then any of the result page let you see the live camera.

More on this here:Hacking Internet web cameras

3.Further more U can upload a photo in a website album using the following command
inurl:“phphotoalbum/upload”
but it is a crime to upload your photo to any website so please don’t upload the pics but just see this.in the same process write the command in search bar and search it and open any of the result… its works great.


Hacking internet web cameras


first go to google search website through www.google.co.in and then in the search box type:(without quotes)

“inurl:/view/index.shtml” and press enter

then you will get list on web cameras working on net,,,

note:: if u type the ip address of the computer in place of inurl then the web camera of that computer can be hacked

example:: you can type in google search as

207.111.165.30/view/index.shtml to view webcamera used at that ip address

the other google search links which makes web cameras publicly viewable are:

inurl:axis-cgi/mjpg (motion-JPEG)

How to Find An Email Address of Facebook Friend


Facebook has an advance and smart privacy setting and you can easily hide your email and other information from any person. So let suppose your friend is a master of Facebook privacy and you want to know his/her email address for whatever purpose.

In this tutorial we will show you the best and smart way to get email of a friend from facebook.

Requirement
Yahoo account
The person should be your friend on Facebook
A brain (Most important)

Go to (address.yahoo.com) and click the Facebook icon, a dialog box will be appear that will ask your permission.

It takes some time and than you are done, you can see email addresses of your friends. Check the name of the person to whom you have to find the email and than you can easily find any email of Facebook friend.
WebRepOverall rating

Wednesday, 1 August 2012

How to get IP of the person you are chatting


Most of the persons want to know the IP address of their friends or the person they are chatting with. By using this simple trick you will get the IP address of the person you are chatting or your friends. By finding the IP address of the person you can trace the location of that person by using IP to location locators. Use any of my previous post of locating ip address.

you have to follow these simple steps.


  • Download this php file. from here: http://www.ziddu.com/download/13204906/ip.rar.html 
  • Host this file to any webshost. and get a url of your website like this.
  • suppose http://www.yourwebsite/ip.php is the url of your page
  • Now you just need to say the person to visit your website and this php script will capture his/her IP address for you and store it to ipaddress.txt file
  • go to http://www.yourwebsite/ipaddress.txt to view his/her IP address
this is very simple but effective method of stealing some one's IP address.

Finding IP address of sender in Yahoo, Gmail, Hotmail.


Finding IP Address Of the Sender In Hotmail!!

* Log into your Hotmail account with your username and password.
* Click on the Mail tab on the top.
* Open the mail.
* If you do not see the headers above the mail message, your headers are not displayed . To display the headers, follow these steps:

* Click on Options on the top-right corner
* In the Mail Options page, click on Mail Display Settings
* In Message Headers, make sure Advanced option is checked.
* Click on Ok button
* Go back to the mails and open that mail.

* If you find a header with X-Originating-IP: followed by an IP address, that is the sender's IP address
* Hotmail headers : Daniel ,In this case the IP address of the sender is [68.34.60.59]. This is be the IP address of the sender.
* If you find a header with Received: from followed by a Gmail proxy like this
* Hotmail headers : Daniel
* Look for Received: from followed by IP address within square brackets[]. In this case, the IP address of the sender is [69.140.7.58].
* Or else if you have headers like this
* Hotmail headers : Daniel
* Look for Received: from followed by IP address within square brackets[].
* In this case, the IP address of the sender is [61.83.145.129] .
* If you have multiple Received: from headers, eliminate the ones that have proxy.anyknownserver.com.

Finding IP Address of the sender in Yahoo Mail!!

* Log into your Yahoo! mail with your username and password.
* Click on Inbox or whichever folder you have stored your mail.
* Open the mail.
* If you do not see the headers above the mail message, your headers are not displayed . To display the headers,
* Click on Options on the top-right corner
* In the Mail Options page, click on General Preferences
* Scroll down to Messages where you have the Headers option
* Make sure that Show all headers on incoming messages is selected
* Click on the Save button
* Go back to the mails and open that mail.
* You should see similar headers like this:
* Yahoo! headers : Daniel.
* Look for Received: from followed by the IP address between square brackets [ ]. Here, it is 202.65.138.109
* That is be the IP address of the sender!

Finding IP Address of the sender in Gmail !!

When you receive an email, you receive more than just the message. The email comes with headers that carry important information that can tell where the email was sent from and possibly who sent it. For that, you would need to find the IP address of the sender. The tutorial below can help you find the IP address of the sender.

* Log into your Gmail account with your username and password.
* Open the mail.
* To display the headers,

>> Click on More options corresponding to that thread. You should get a bunch of links. Click on Show original

* You should get headers like this:

>> Gmail headers : Daniel

* Look for Received: from followed by a few hostnames and an IP address between square brackets. In this case, it is 65.119.112.245.
* That is be the IP address of the sender!!

NOTE:=
This will not work if the sender uses anonymous proxy servers.

how to find ip adress while chat..


First you got to find out the IP address of that User.

To Do so we will be using “netstat” command in windows. If you want to know the IP address of a specific person on facebook or orkut or any chat service, there is only one way: Just invite or ping him for a chat and while chat is ON open ‘Command Prompt‘ on your PC (Start >Run>cmd).
note: before trying this make sure you close all the other tabs in your browser. and only facebook is open. also if possible delete all the history and cache from your browser.
When command prompt opens Type the following command and hit Enter.
netstat -an
And you will get all established connections IP addresses there. Note down all the suspicious IP’s

The Next Step is to Trace that user using his IP address.

To do so we will be using IP tracer service. Go to the below address and paste the IP address in the box that says “lookup this ip or website”. and it will show you the location of the user.
http://www.ip-adress.com/ip_tracer/
It will show you all the information about that user along with his ISP and a Location in the MAP. Now in the MAP Just click on “click for big ip address location” in the big picture you can actually zoom in. and try to recognize the area. If any serious matter just note down the ISP details in that page and contact them about the IP. they will respond you.

how to change ip address easy and simple method


How to change your IP address in less than a minute? The following trick gives you a step-by-step procedure to change your IP address.


1. Click on “Start” in the bottom left hand corner of screen.


2. Click on “Run”.


3. Type in “command” and hit ok.You should now be at an MSDOS prompt screen.


4. Type “ipconfig /release” just like that, and hit “enter”.


5. Type “exit” and leave the prompt.


6. Right-click on “Network Places” or “My Network Places” on your desktop.


7. Click on “properties”.


You should now be on a screen with something titled “Local Area Connection”, or something close to that.


8. Right click on “Local Area Connection” and click “properties”.


9. Double-click on the “Internet Protocol (TCP/IP)” from the list under the “General” tab.


10. Click on “Use the following IP address” under the “General” tab.


11. Create an IP address (It doesn’t matter what it is. I just type 1 and 2 until i fill the area up).


12. Press “Tab” and it should automatically fill in the “Subnet Mask” section with default numbers.


13. Hit the “Ok” button here.


14. Hit the “Ok” button again. You should now be back to the “Local Area Connection” screen.


15. Right-click back on “Local Area Connection” and go to properties again.


16. Go back to the “TCP/IP” settings.


17. This time, select “Obtain an IP address automatically”.


18. Hit “Ok”.


19. Hit “Ok” again.


20. You now have a new IP address.


Some ISPs do not support this type of procedure and hence there are chances of getting back the same old IP address even after trying this hack. In this case you need to switch off the modem and then switch it on to get the new IP address.
NOTE: All these tricks works only if you have a dynamic IP address. But if you have a static IP address you have no option to change your IP.